
Placing B3’s Gulluvia Map
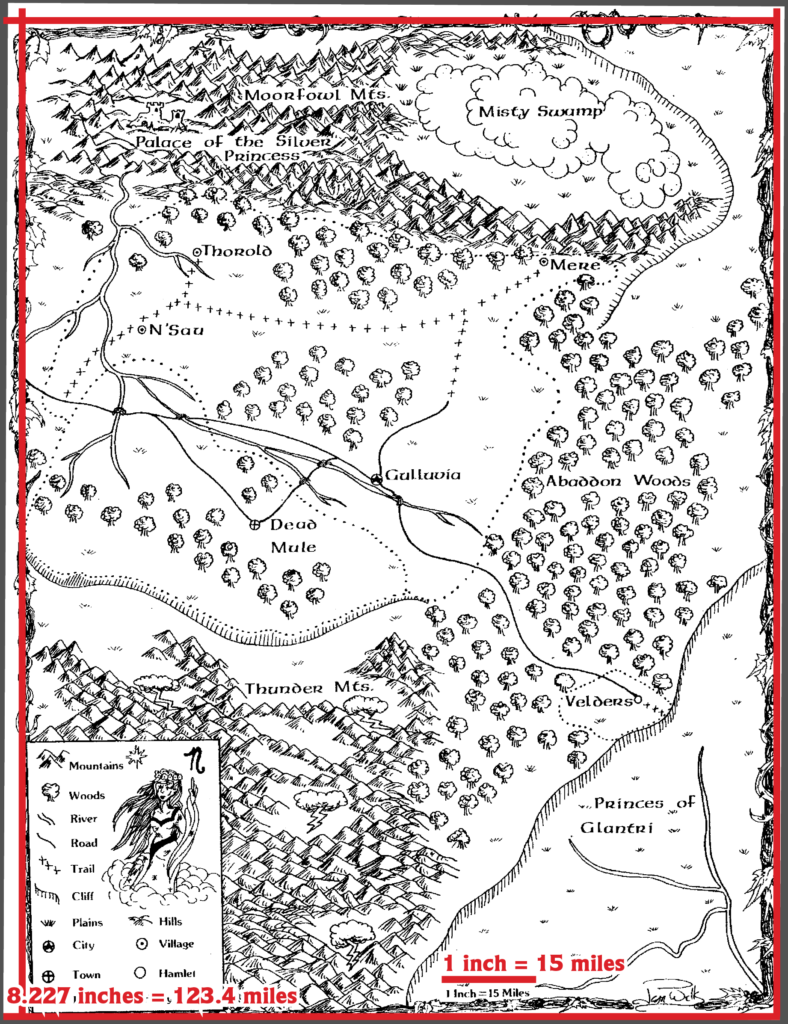
The original version of B3 Palace of the Silver Princess (1981) included a map of Gulluvia, in the region that would later be the Adri Varma Plateau. The module itself was recalled and destroyed — you can read the full story at the Vaults of Pandius here, as well as download a PDF of the original module, which Wizards of the Coast made available more than twenty years after its abortive release.
The Gulluvia map was almost certainly unknown to Mystara’s designers due to its history, and as a result of this no other products reference Gulluvia, and the Adri Varma Plateau was developed in another direction, taking on a wastelands theme with extensive badlands and cacti.
Because of all this, as well as the nature of the map itself, integrating Gulluvia into Mystara is quite a challenge at this point.
Michele Carpita and the Italian Mystara community chose to adapt it to the new conception of the Adri Varma, placing various elements from B3’s map into the terrain from maps in Wrath of the Immortals. I have posted an archive of the original post for reference. Francesco Defferrari has created a larger scale version of Michele’s map, available at the Vaults. Omnibus has written a gazetteer for this version, bringing it and other fan ideas for the Adri Varma into a cohesive whole. Gary Davies produced the English version of this, together with an English version of the map.
But my Let’s Map Mystara project demands that I place it using only contemporary maps if at all possible. So I’d like to explore the map with reference only to the original X1 map.
Before we continue, it’s also worth noting that Entire Party Killed has already created an 8 mile hex replica of B3’s Haven map, but it requires an account to access. This is relevant because if possible I’d like to make my map fit with the placement of their hex grid.
A Problem of Scale
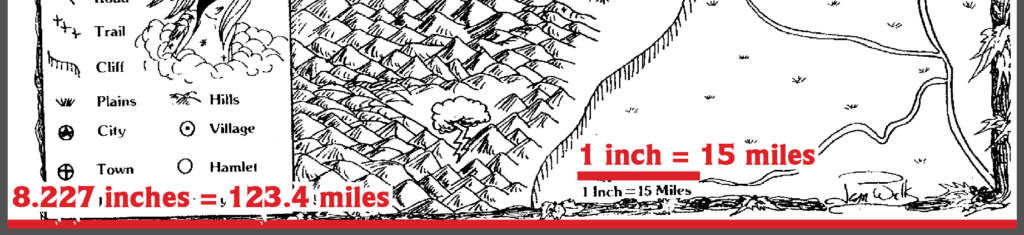
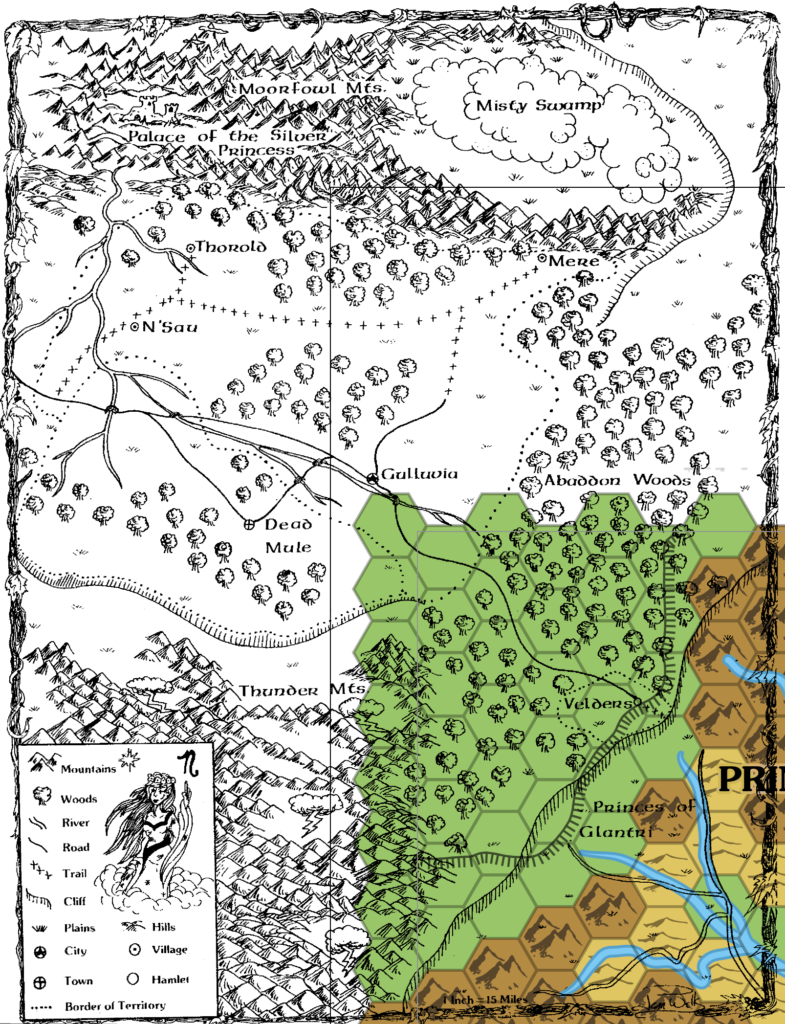
The first challenge is working out the scale. The map itself has a label claiming 1 inch to equal 15 miles. It was likely printed on a standard US Letter-sized page (8.5 inches across), and indeed the scan measures 8.227 inches across, which seems consistent. Taking this at face value, we can work out the exact scale as follows. First, I created a 15 mile ruler, scaled to my georegistered version of the X1 map. Next, I scaled this to 8.227 times its original width, which comes out at 123.4 miles.
With this measurement done, the exact scale of the map should match X1. Next, I noticed that the map was a little squint on the page, so I rotated it ever so slightly to make the borders look a bit straighter. It doesn’t seem possible to make them completely straight, however, as they were clearly drawn a little squint.
Although the map is scaled to the 24 mile per hex X1 map, these hexes are far too big for this area. So let’s try overlaying some smaller hexes. (The location of the grid is still flexible at this point until we place the map — this overlay matches Entire Party Killed’s map, mentioned above.) First, 8 miles per hex:

This looks okay, but the map seems to have a little more detail than this scale allows. We’ll undoubtedly want to have it in this scale eventually, since it’s the Known World standard, but for now let’s try a little larger scale that affords a bit more detail. How about 6 miles per hex, to match X1’s Karameikos map’s scale:
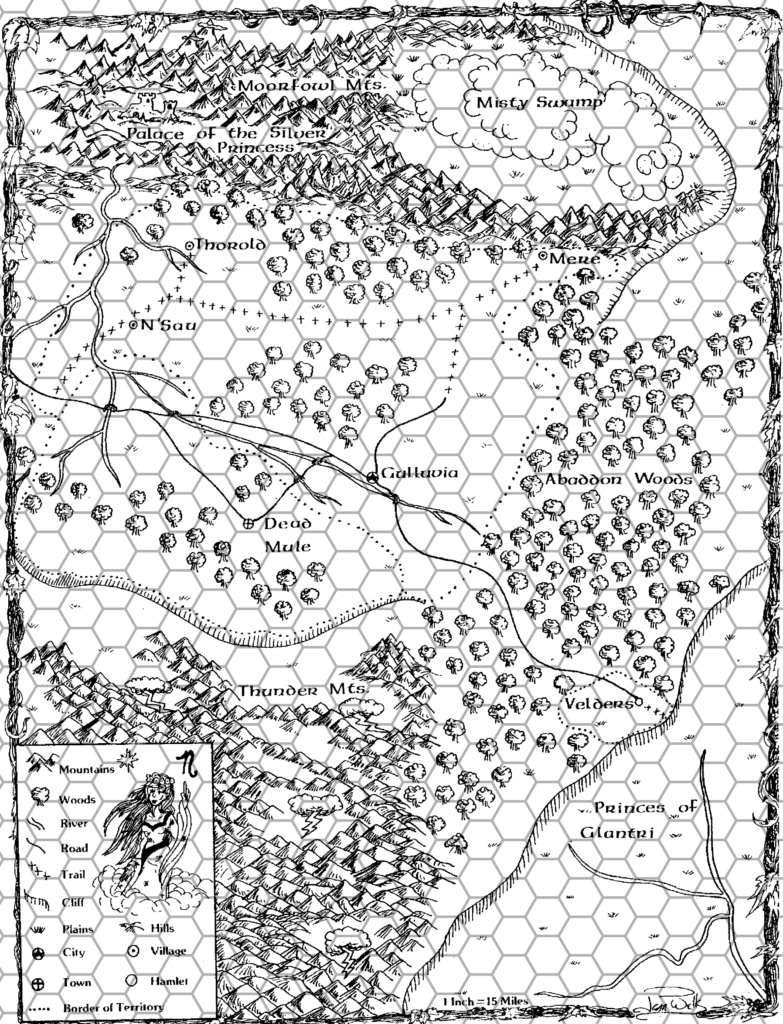
This looks pretty good — it should be adaptable without losing too much in the way of detail.
The Perpetual Problem of Placement
Next up, let’s turn the grid off for a moment and try placing the map on X1’s 24 mile per hex map.
There are two major landmarks to assist in placement: the plateau, and the rivers in the southeast.
Plateau Placement 1
Starting with the plateau, it doesn’t fit very well, but this seems like a reasonable location, largely fitting the map to the extents of X1’s plateau.
The eastern edge is a bit off, so let’s try a slightly different placement.
Plateau Placement 2
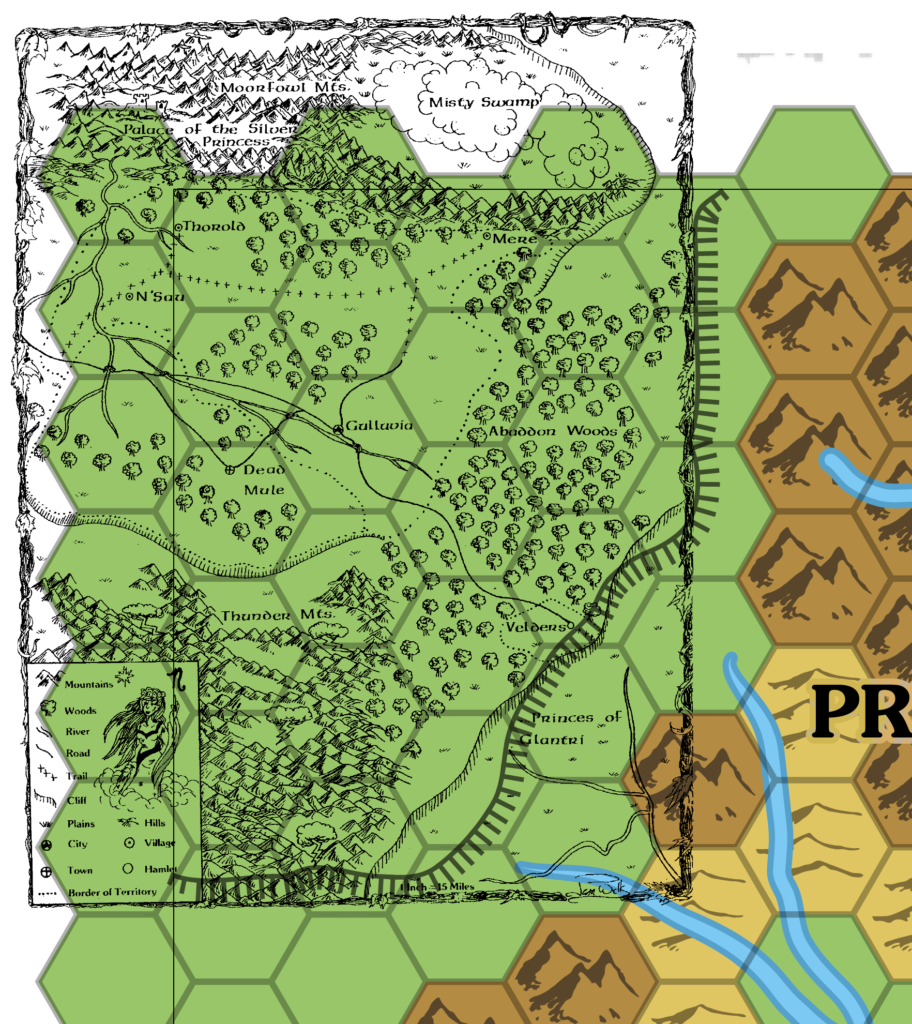
This looks rather good, though the south edge is now a bit off.
Either of these would be fine; it’s not really possible to match up the plateau perfectly, and in any case it’s a completely different shape.
River Placement
The other option, the rivers, is a little more fiddly. Did you notice how the rivers on X1 are far bigger than B3’s rivers? This means that in order to place based on the rivers, we’ll have to rescale the map, this time ignoring the printed scale and matching the size of the rivers visually.
It works, although the rivers don’t match perfectly, and in the process we are making increasing the size of the area shown on the map quite drastically: what was previously 123.4 miles wide is now 297.6 miles wide. Note that Michele and Francesco’s version actually adapts B3’s map to an area even bigger than this.
For our purposes, going with the map’s printed scale seems to be the most faithful to the original map, so let’s go with Plateau Placement 2 above.
Hexing Up the Map
With placement and scale decided, it’s now time to convert the map to a full hex map. I’ll post the final conversion in the next Let’s Map Mystara post as soon as I get it done.
In the meantime, please let me know what you think of this placement and scaling.


24 April 2018 @ 10:58 pm
I’ve considered squeezing this in, with adjustments, at the westernmost caravan route from Darokin to Sind, west of the lake.
24 April 2018 @ 11:20 pm
A thought when looking at plateau placement 1: How well does it line up if you move it 1 more hex northeast and slightly rotate? So that the bump on the B3 plateau lines up with where the GAZ plateau turns north? It looks like the plateau line might be a better match overall there. Another question – how well does it line up with the X1 map? (Probably not enough detail from that scale I’m guessing, but it might be worth a quick look.)
24 April 2018 @ 11:31 pm
The screenshots here are of it over the X1 map.
One hex northeast of placement 1 is placement 2 isn’t it?
But note that the shape of the plateau varies quite a lot depending on the map. Even just at 24 miles per hex, there are numerous versions, all the same overall but varying in details and location by as much as half a hex (12 miles). So there’s not really much point trying to place it exactly at this point in the project. It’s going to be arbitrary wherever it goes.
For a more permanent placement, I’m not sure what the best option is. I rather like what Michele did with it, although it definitely spreads it out over a drastically larger area than B3 had it in. Having Gulluvia close to Glantri and the edge of the plateau doesn’t seem terribly great an idea, either.
24 April 2018 @ 11:44 pm
I have battled with B3 too (https://6inchnails.deviantart.com/art/Trail-map-North-360178285) to fix it into an 8 mile hex like the Known World maps.
Maybe my work can help, but it does not include the most south sections.
25 April 2018 @ 12:29 am
I think Greg’s idea is that ‘Velders’ should be in hex 0603, not 0504, which means the headland Velders stands on will line up with where the plateau turns north; also it looks like the river will line up better with this placement, as it seems it could be a northward extension of the eastern, N-S river.
That’s what it looks like to me anyway.
25 April 2018 @ 8:54 pm
But that would put the eastern part of the map off the edge of the plateau. Seems a shame to waste that bit of terrain.
Another point is that later in publication history (1983’s Expert Set) two trails are added leading up onto the plateau. Unfortunately neither location is easy to match with Velders… They are at 0602 and 0405. GAZ3 later missed out both of these, while TM1 restored the southern one.
26 April 2018 @ 1:18 am
It would put the eastern Abbadon Woods outside of the line of the plateau that you’ve used on the 24-hex overlay. There will always be some discrepancies between the two, and if I’ve understood you correctly, even taking B3 out of the equation, the line of the plateau changes on different maps. I guess it’s a matter of taste. That doesn’t look to me like a very important bit of the Gulluvia map, I might be happy to lose it, to keep the shape of the plateau round Velders, or alternatively tweak the line of the plateau by half-a-hex or so on the 24-hex map so it conforms to the Gulluvia map.
The matter of the trails is more important I think. Neither of those trails plausibly represents the road from Velders to Gulluvia and onwards. Trying to fit Velders to either looks like it means losing much more of the Gulluvia map. However, as the map with the trails also locates B3 in the eastern part of the Grand Duchy, it’s inevitable that the two maps will not match exactly! With the slightly more northerly position of Velders that I and I think Greg are proposing, the line of the northernmost trail is … ‘somewhat close’ to the road on the Gulluvia map. Closer than the borders of Thyatis anyway. But it would be much closer if one of the trails ‘split the difference’ and went up the middle river.
25 April 2018 @ 7:51 am
It’s okay for the rivers to look like they are at different scales. Retain the integrity of the scale rather than the width of the rivers.
27 April 2018 @ 12:05 am
Red Orc is correct in his assessment of what I was suggesting. And I concur with his thoughts on the eastern bit of the map. To add another thought regarding the trails… we’re dealing with a plateau. The switchbacks (or whatever) necessary for foot access to the plateau might only exist at certain points, such as where the trail crosses the plateau boundary. Which might not coincide with where the towns are (which tend to be close to waterways).
6 May 2018 @ 12:32 am
I agree that keeping old B3’s scale is the first and foremost option; about the rest of the details, after all B3’s is a hand-drawn map, so it’s not expected to be precise nor matching exactly with any other map.
I’d like to drop another possibility for B3’s placement. While keeping the map scale as in the original B3 version – even if the three rivers shown in B3 clearly represent the 24-mph Glantri rivers – imagine that the three Glantrian rivers shown on the east side of the B3 map are not the GAZ3’s Tarn, Loir, and Isoile rivers, but actually the detailed upper course of the Loir alone (the northernmost river among the three). B3’s unified river course could then be moved to match the apparent source of the Loir on Expert Set’s KW map. This way the Velders’ plateau bulge will match a similar one on the Expert map, and the two trails going north-west from Glantri would connect north of Gulluvia (maybe to Mere?) and pass south of the Thundering Mountains, beyond the bottom of B3 map. This way, we’ll only lose a little strip of the B3’s plateau on the right edge of the map.
I’ve tried this solution on my layered map, but to see if it’s a viable option Thorf’s precision would be required. 😉
14 July 2018 @ 3:24 am
Shift the B3 overlay in option 2: 1 hex North, half a hex East. Try it and see what I mean. The 3 branches of the river on the B3 map will then branch from the end of the top river in the gaz map.
23 March 2019 @ 10:44 pm
Hi Thorf
Pondering on the locations of the Castle of the silver Princess as per variant B3 sources Icame on your research here.
Apparently you paused this research. I hope you will renew your interest here
Have you seen Micky’s work on this matter?
https://www.dropbox.com/sh/9ta2j6mjk4qfrgt/AAA_g2tGZONrowNvuBR2zeona?dl=0&preview=Glantri+1014.png
https://www.dropbox.com/sh/9ta2j6mjk4qfrgt/AAA_g2tGZONrowNvuBR2zeona?dl=0&preview=NewAveroigne.png
And ofcourse the PC4 nighthowlers map of the Averoigne region…this might give you information where to twist/bend /create /sove contradicting flaws in the O(orange)B3 vs X1 map as yyou explain here.
I myself would go with your plateaux option 2,
However I would keep both the X1 and the OB3 rivers as they are….for one simple reason; enlarging the scale brings more detail. And it would not descredit either map.
Then their will remain only one discrepancy wheree the rivers seem to cross. I would bend the B3 river northwest to come close to the X1 yet due some unknown obstruction(hill) I would let it flow north, meeting the other rivers, flowing as they are until they meet the rivers as presented in X1
Btw your scaling is exact…I have an original and checked.
The problem I see in the existing AdriVarma Map (http://www.pandius.com/adri.jpg) by Francesco has shifted many location of the OB3 map.
For example the Misty Swamp in larger on the OB3, more north, and the Moorfowl mountains are more south… This would this place the Castle of B3 not in the woods as Francesco did, but as OB3 in the mountains. Which will be consistent with the )B3 map and text; the castle is away from the rest of the world seemingly, as also described in B1-9, G(Green)B3
Just some thoughts to ponder upon.
Greets
Robin
B3 Gulluvia | Atlas of Mystara
16 May 2021 @ 8:07 pm
[…] This is Map 6. It was published in 1981, although since B3 was recalled almost immediately, it didn’t become widely available until 2000. The updated version of this map has not yet been released. See also Appendix C for annual chronological snapshots of the area. For the full context of this map in Mystara’s publication history, see Let’s Map Mystara 1981 and Placing B3’s Gulluvia map. […]
Gulluvia, 6 miles per hex (1983) | Atlas of Mystara
9 August 2021 @ 9:00 pm
[…] Placing B3’s Gulluvia Map — the original post at Thorfinn Tait Cartography discussing Gulluvia […]
Gulluvia, 6 miles per hex (1981) | Atlas of Mystara
4 January 2022 @ 1:26 pm
[…] Placing B3’s Gulluvia Map — the original post at Thorfinn Tait Cartography discussing Gulluvia […]